Tuesday, May 31, 2011

Happy Dabblings...

Bonjour! C'est moi,
I've been away all weekend having a great time at the Artsy Crafty weekend, so what do you do when you come home from such an intensive session? Well, do it all over again in my case. I've been finishing off the weekends projects (I am never done in time) and also playing around with two ideas that were tugging at my sleeve. Firstly my take on the Less is More challenge, where we can choose from 5 square areas for our focal point.
 I think you can figure out my choice for yourselves! I wanted to have a go at a clean and simple card a la Wendy Vecchi style. I think her bold yet simple stamps are very versatile and lend themselves to many different projects. I have cut a window in Kraft card stock and inked all the edges. I did fancy a corner window as I prefer off-centre, but I thought the flowers might be too heavy and wasn't sure if the proportions would work.

I stamped the flowers onto Grunge paper, painted them with Claudine Hellmuth studio paints and then stamped again with Archival ink. I used the Live/Be Happy and make Art sets and the leaves are from the Love to make Art set. The polka dots are by Darkroom Door. I've slightly inked the edges and added a couple of old tatty buttons for the centres. I was just able to attach a few petals to the card without any hidden support.
I felt the corner looked too bare with just a sentiment. Stamping the leaves in Sepia ink balances out the browns and blues and the whole card. I'm very pleased with the outcome as it's what I had in mind and I'm glad to be able to use my Wendy stamps on simple cards too.
That was all so much fun I moved straight on to my next project...
Last week I was busy getting my DT work done before my weekend event and just couldn't find time to join in with Challenge 14 at Everything Wendy Vecchi. Booo...! The task involves a card, a chipboard circle with an ATC and if there's one thing I love it's an ATC. Just making the deadline by a whisker, but I had to have a dabble. Hooray...! This is actually a mini canvas coloured with Distress Stains because, could I find the right brown for the background amongst the unknown depths of my paper stash...??? Could I heck as like. Sigh.

I didn't plan on doing the brown tones at all, but sometimes a piece tells you where it wants to go. I created the background by stamping the leaves onto textured card stock and then blending Distress ink over the top. Rather like it and love the dog tooth Graphic 45 paper which was a great contrast and boost. Mr. Birdy is enjoying a moment on the scallop!
The Art Parts flower had been inked with Rusty Hinge. I used the ink pad directly onto the flower and got a great rich colour. I then stamped the script in white Stazon and applied more ink with a blending tool to soften the effect. I wanted to place the sentiment behind a distressed frame and make the ATC look like a mini picture. Added just three press studs as I wanted to keep things pure. After a slow start struggling with colour choices, things went really swiftly and a good night was had by all.

So that's me all done. Just want to say I hope you like them and thanks for dropping in!
See you around soon,

Sarah.

Monday, May 30, 2011

Let's Go Retro...

Hello Everyone,
Here in the UK it is a public holiday for many, so for those still lounging in your PJ's - indulge,  and to those being chased by Monday Morning Mania, we think of you! The new week brings a new challenge over at Simon Says Stamp & Show where we say, "Show us your favourite stamp..." Now that's one for everyone and you'll know in a flash or be pondering all day. No doubts from me on this one, I cannot resist the allure of the mademoiselle in Pattern Pieces. The challenge with a beloved stamp is finding new ways to let them shine... so inspired by fashion icon Jackie Onassis, this lady has gone Retro.
I think she radiates all the glamour of the late 50s/early 60s which I wanted to combine with the sleek and modern design of that time. A red Chanel suit, a New York skyline and handbag were the three elements I chose to create the mood.

I stamped my lady onto card, cut her out and then water-coloured the image with Claudine Hellmuth paints. Then I stamped the image again onto red checked paper, embossing it in black for extra detail, and then cut out just the suit, hat and gloves. I then glued these onto the first image. It was a fiddly bit of cutting but well worth the effort as she is dressed for success.
I really wanted a skyline in the background and as I possess the grand total of five dies I cut it by hand after sketching it out on paper. It was great fun - loving all the straight lines and corners. I then embossed the stars by moving the Cuttlebug folder along the whole section bit by bit, matching up the overlap. I applied Black Soot Distress ink over the surface to make it really black and then set it on card for strength.

I wanted to keep things slick and clean but I also wanted to add a bit more contrast and mood. The two words "City Chic" in white cut using the Chip Block Alphabet and a line of red ribbon were just the job. Red and white are always a strong duo! All I had to do then, was place them all in a frame. A handbag seemed the perfect setting. I drew a template free-hand which allowed me to create exactly the size, shape and look I wanted. I cut it from card, added an old but fab design paper and inked the edges in Black Soot. Add a handle and two big shiny buttons and she is good to go!

I layered them up to create a feeling of depth and I'm really pleased with how things turned out. Very glad to have given my favourite stamp a re-vamp. I did have to be very precise with the cutting and between you bad me, this is lady number three. The first two didn't pass the screen test...don't call us, we'll call you. I'm glad I did the paper-piecing as now she really is wearing that suit!

So there you go, now it's over to you. Which stamp have you got in mind? I'm really looking forward to seeing what everyone will come up with. Still wondering...? See more fabulous ideas from the rest of the Design Team over at the  Simon Says Stamp & Show blog. There you'll also find all the details about the challenge and prizes...
Be inspired, be creative and I'll be seeing you all soon. Thanks so much for calling by...would love to hear from you, so do leave a few words.... Bye for now.

Sarah.

Friday, May 27, 2011

Three little things...

Hello Everyone,
Well, I've just cleaned my WHOLE house, I've got tomorrow off work and I'm off to the Artsy Crafty Weekend for some serious playtime...I think that counts as a hat-trick! So, with a clean conscience (and home) I can share this week's offering for Grungy Monday. If you are joining in, do read Linda's post about links, copyright and due credit in regard to Tim Holtz. I think a lot of folk think that because he's very successful, both artistically and commercially, that it doesn't really matter if you bend the rules. All I can say is, no one likes having their work stolen or falsely accredited - however big or small you may be. Do unto others, love thy neighbour...etc., oldies, but goodies.

So here's mine - sticking with tags as I quite like the limitation in size. This week we're dabbling with a kind of Brushless Water Colour technique which, in a nutshell, is stamping with a misted, inked-up stamp!


The technique can produce quite a soft feel, but I wanted to still keep things a bit grungy. I have cut a tag from a textured design paper and white-washed it with some Snow-Cap Dabber. I have used Adirondack in Juniper, Butterscotch and Cranberry and stamps from the Mini Ornates and Urban Chic ranges.

Here you can see a bit more of the texture. I gave it a good dose of distressing and blended Fired Brick and Brushed Corduroy around the edges. The words were stamped in Plum Archival ink. I splashed on some water and started to scratch away some of the paper so it kind of looks like an old canvas. Then, for the sake of market research... I decided to do it all over again! On Claudine Hellmuth's Sticky-Back Canvas.


The canvas soaks up more of the water but I still like the look very much. More or less the same but blended with Rusty Hinge and Fired brick this time, stamping the words in Black Archival.


I do love this canvas...there's so much you can do with it. If I'd had more time I'd have been stitching all over it...!
I went for the natural one, you can also get it in white. I definitely recommend some playing around with it.

 
And coincidentally Mr. H's technique was also chosen as last weeks challenge over at Everything Wendy Vecchi. I had just five minutes to spare but you can see how quick, versatile and effective it can be...

So that's my Grungy gossip for today....and now I'm going to come over to yours. I hear Blogger is being moody with the comments but I will do my best.

Thanks for calling by and all the lovely comments from last week about my tag and Memorabilia piece. I am extremely honoured and very excited to share that I am the featured artist over at The Kraft Journal today!!!!!! Thank you so much!


Hey, it's now Friday over here... The weekend has landed! So make sure you have a good one.

Sarah.

Wednesday, May 25, 2011

Pure and Simple with Less is More...

Hello there, (WOYWW visitors - please see previous post!)  
Time for my mid-week indulgence in the purer things in life. I like to reside in both the North and South of creating so my weekend was spent on an intense but fabulous Wendy Vecchi project and today I relished in the realms of Clean and Simple. This week at Less is More, it's butterflies. Funny enough, yet again, I did this week's theme last week. All pure chance - I don't do computer hacking.
I fancied the idea of a mini-canvas as my focal piece and so I used Claudine Helmuth's Sticky Back Canvas from Ranger as a base. I have used some old, never used, gold (!) butterfly peel-offs as masks. I stuck them randomly over my canvas and then stippled Fired Brick Distress Ink using some Cut 'n' Dry foam. Lift off the butterfly and all done. For some unknown reason back in my rookie days, I bought a load of peel-offs. As you do...

Here is a close-up to show the texture of the canvas. It's very versatile and I like to work with it a lot. It comes in white and natural and you can paint, sew, transfer and die-cut with  it. Even run it through your printer and then just stick it where you want. Easily repositioned too. Makes fabulous flowers...I thought I'd tell you about it as you might see it in a shop and think "What's that?" and just pass it by as a card-maker.


Once I had covered my piece of canvas I cut it into three. I mounted each piece onto green card, lightly distressing and inking the edges. I used a nearly white ribbed card stock. Not pure white as that was too harsh.
Here you can see where I have slightly frayed the edges of the canvas before sticking it to the card. I also played around with brown and tones on a book page which also looked great but went for the bright red and green as I already do a lot in vintage tones. You can also get a nice effect with by using and blending different colours. I do think it's a welcome change from card and adds a bit more texture to your work.

 Just enough for a small square one. Finished off with a simple satin ribbon and sentiment. The first sentiment is Wendy Vecchi, middle one unknown and the last one Paper Artsy. As said - lots of options but I felt just right with red, green and white (see it even rhymes).

I hope you enjoy them, might have learnt something and are having fun with your own. So I'm signing off and going to have a meander through your creations...

Thanks for calling by. Do let me know if you have any questions - always happy to help out.

Sarah.

WOYWW and mid-week waffle....

Hello there and welcome,
Stop the year - I want to get off...! I'm not having a meltdown but my oh my, it will soon be June. God must have the angels peddling like crazy up there, because the world is definitely spinning faster. Back on Earth and more specifically on my desk, life look like this...My weekly dose of "What's on your workdesk Wednesday?"  The 'soon to be two' brainwave of Julia.
 Jackie Onassis and Salvador Dali in drag were just a bit of doodle therapy to bridge a dull moment. Got a few things on the go today, some of which I may not divulge as of yet, including my gift for the WOYWW party. In fact, it is so cleverly concealed, not even I can see it, but that may have something to do with the fact that I haven't made it. It's in "processing"... I'm off to the Artsy Crafty weekend on Friday, so I'm having to change gear and must get my DT piece all done asap. I'm really looking forward to it, meeting all the folk and a dose of creative vitamins.
Over at Hels and the Sunday Stamper, the theme is Diamonds and Pearls, so I thought I'd play along, and just have some fun...

Just for the record, the quote is by Zsa Zsa Gabor. I'm still working on getting the diamonds before I can consider giving them back to anyone. As said, just a bit of fun. But that is what I love about creativity...freedom of expression and I fancied being a bit OTT with glamour and bling.

 At the other end of the scale, a simple tag using the Brush-less Watercolor technique (in a nutshell - stamping with an inked and water-misted stamp). It's Wendy Vecchi style over at Simon Say's Stamp & Show where you can also see my new design piece. Mrs. V. herself called by which is a great honour! Seem to be catching a bit of a Wendy flower bug...

Last week I had a book giveaway and I'm glad to announce that the winner is Milla from Finland! Well done, I'll be mailing you later today!

Time to be going and doing. Thanks so much for dropping by.
See you soon,

Sarah

Monday, May 23, 2011

Make a Little Birdhouse for your Soul...

Well Hello Monday,
Here we are again in post-weekend mood so it's time also to share my new Design piece and the challenge over at Simon Says Stamp & Show. The photo is a slight hint but, for the record, this week we are going à la Wendy Vecchi by celebrating the Studio 490 style. So butterflies, polka dots and flowers do indeed abound in plenty!
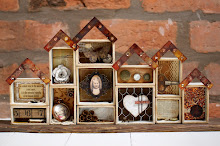
As an all or nothing girl, I decided to jump in heads first with lots of Wendy Vecchi stamps, Art Parts and Clearly for Art. Think Wendy, think flowers...I instantly knew I wanted to create a floral extravaganza and there began a journey of stamping, scissor-work, sanding and sticking! I've had my eye on this old wooden beam from my shed for a while and it made a perfect and natural base for my piece.

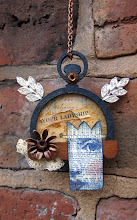
The flowers are created using the Live and Make Art and Be Happy Make Art stamp sets along with some of the Art Parts Florals. I chose these because wanted to mount the flowers on wire and also achieve a consistent look (and save the other shapes for next time!) I used lots of different materials and patterns but stayed with a brown and blue mood which always comes up trumps for me!

 Here I have glued design papers to Grunge Paper for extra strength and flexibility. I stamped and cut out the large flower, stamped the words in Sepia Ink and added some shading with Stormy Sky Distress Ink. I have been a good and fussy lady inking all the edges, flower backs, and then sealing them all with Matt medium. A job indeed - but definitely worth it for the finish and durability... I want to build 'em to last. It was a fair bit of scissor work but I quite like snipping away...helps me relax!

Here you can see two variations. The left flower is a duo of design paper and Clearly for Art coloured with Alcohol inks. The right one is a lurvely chunky Art Part painted with the truly yummy Studio paints from Claudine Hellmuth. Then I stamped, sanded and edged with Distress ink. If you want to get more into paint - these are just great. I invested in them quite a while back and love them. Fabulous colours, quality and a myriad of possibilities.

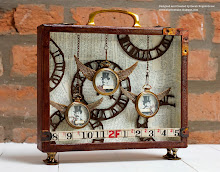
Here is my little bird house...! Made from the Art Parts Scallops set. I covered it with paper, stamped and again took time to sand the edges for a smooth finish and also to allow the ink to take better. (I'm not just mad you know...)I trimmed the bottom just a little to balance out the roof and created the back using some stitched Sticky back Canvas. I stamped and embossed the phrase with Distress Powder, cutting it in three to fit into the house. And look at that, my birdy friend  can perch just perfectly on the ledge. I do like life when a creative plan comes together.

 I felt the need for a spattering of red and green but also wanted to keep things simple as the flowers are quite elaborate. Art Part leaves have been embossed with Peeled Paint Distress Powder giving great texture and colour. I really like look of the raw wood complete with rusty nails, and yes, my house is still intact! Although there is plenty left to plunder in the old loo house yet...
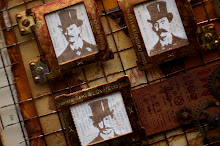
The butterflies are stamped on Grunge paper, coloured with Fired Brick Distress ink. I added a double ribbon metal thingamajig (?), re-stamped the word FLY and glued it on top. I've got a zilllion things in my Embellie Deli so time to get them out and on the job. Mission accomplished here, because even if I do say so myself (which I am), methinks they looketh good. I glued the flowers to wire, drilled some holes in the wood (not for those with dental phobia) and in they all went. Standing strong during a rather windy garden shoot!

Yes - another flower pic. Here you can see the Alcohol Ink-dipped washers, nuts and press-studs I used for the centres. I have to say I had a ball creating this and working with all the Wonders of Wendy. I'm already a stamping nut, so all good there, but I didn't expect to have so much fun with the Art Parts. I must be honest - I get a bit feverish if something is pre-cut and "ready-to-go" but these quality pieces are very willing to go with your flow. Still experimenting with Clearly For Art. You just need to take some time to play around and see what works for you. Oh, there's oodles I could share but I must wrap it up. If you have any questions, just let me know.

Back to HQ again...I hope you now feel all flower-enpowered and ready to join in with the challenge. Don't forget it's Studio 490 style...so whether you have lots of Wendy stash or not, it's about being inspired, creative and yourself! Head on over to the Simon Says blog for details and some great pieces from the rest of the Design Team. The Top Three Coveted Award and $50 shopping spree awaits...


Thank you all so much for calling by each week and all the lovely words from last week. I read and appreciate them all. Simply said - love to create, share and hopefully inspire...

See you soon,
Sarah.

Thursday, May 19, 2011

Feeling the colours on the inside and out...

Evening Greetings,
Almost weekend, ready for that Friday feeling and glad to report the off-track creative mood of late is on the decline. No complete meltdowns, just an "it ain't working..." thing. Yesterday I stumbled across a theme that captivated me, and got me back on home ground...therefore my post title. Two offerings to share tonight.
Firstly a tag a la Grungy Monday with Mr.T's colour blocking. I have to admit I wasn't so keen at first. Sorry, it's just me. Still learning simple is beautiful too.
Scattered Straw, Rusty Hinge, Stormy Sky, Bundled Sage and Fired Brick Distress Inks, all given a good blending to soften the edges and then edged with Brushed Corduroy. Over-stamped with polka dots, two yummy splats with Distress Stain followed by some paint rings!

 Love this stamp by Tin Can Mail, it just oozes vintage. I re-stamped the gals and words for extra depth, love snipping away with the scissors...
It needed a blast of something so numbers and Distress powder. I created a faux enamel flower topped with a paper one where you can just about read 'proud hearts'. Finished off with a few staples and fake stitching around the edges. Tageology therapy complete! Liked it so much it found a way into the next one.

This Saturday it is Armed Forces Day in America. I'm in England, but it makes no difference. I don't think I can fully appreciate or comprehend the privilege of living in a country at peace, or having a loved one out at war.
A few years back I watched the truly amazing Band of Brothers, and to this day it still moves me. Over at The Kraft Journal the theme is Stand and Salute. It's not about the challenge, this one is from the heart...

Evacuation poster, England 1942. In Britain during WWII 827,000 schoolchildren and their teachers, 524,000 mothers with children under five and 12,000 pregnant women were evacuated.


 A glimpse of an Identity Card and the colour-blocked Kraft tag stamped, with someone's loved ones and the simple word "together"... I mounted the whole piece on an old brown envelope as it kind of echoes the make do and mend attitude that was necessary at the time.


This vintage photo of a British Air Pilot was my inspiration. It touched me so deeply, the picture says it all.


An old French map, a Union Jack flag and stars to symbolise, among many all over the world, the soldiers who fought together from Britain, France and the United States during the Second World War.
"Never in the field of human conflict was so much owed by so many to so few." Winston Churchill's famous words after visiting the forces.


A Kraft rosette as a symbol of honour and pride and also the date on which Mr. Churchill gave his famous speech during the Battle of Britain.
It's not an easy subject. This is just a very small gesture to honour those that have been and those that are still on the front-line, because what ever you believe, to remember is good.

Thanks for calling by.

Sarah.

Less is More...indeed it is.

Hello there...
To fellow LIMettes and all. (WOYWWers - see previous post!) Do you know that moment when you're cooking up something tasty and you realise you haven't got an onion? What ever you throw into the recipe, it just isn't quite right. Well, that was me big time on Monday when I was working on my cards for Less is More. Definitely needed an onion but the cupboard was bare, so to speak. The ideas were there, but just not realising themselves on paper resulting in a generous donation to the paper recycling bin on my part. Thankfully one did just make the cut...
This week's theme is one layer with embossing, which does demand a certain level of technique and precision whatever style you choose, other wise it just looks naff. Time, patchy adhesion and bad choices in card stock took their toll and saw me keeping it simple and going back to one of my first ideas. Also a question of allowing myself to keep it simple...

I really fancied an injection of colour after working on a vintage project all weekend and what better way to spice things up than with red and green! The Bazzill card is fairly textured so I swiped it with gesso first to create a smoother base for the stamp and make the red pop even more. Gave it a light sanding, stamped this great Paper Artsy image and  embossed with Fired Brick Distress powder. Stamped a simple word in black Archival. I distressed the card edges and added some cotton string to keep up the slightly raw feel. In retrospect, not a bad little number considering the frustrations! But that's all part of the journey...no ups and downs would mean constantly walking along just one straight line.

 Okay - philosophy lecture over...and definitely time for some sleep therapy. Thanks for calling by, do check out the other entries, there's always a great show of creativity and who doesn't like a little Blog love?

Buenos Noches,

Sarah.

Wednesday, May 18, 2011

WOYWW AND BOOK GIVEAWAY!!!

Good morning, afternoon, evening or even Thursday,
Could be any one considering the WOYWWers are spread over the entire world and half of us don't observe normal sleeping patterns. For the confused -  WOYWW means What's on your work desk Wednesday? In short, over at Madam Honeysuckle Julia's blog Stamping Ground, you link up a picture of your work space and everyone comes round for a peek. No dusting, manipulation or nose-jobs allowed - show and tell!!! That's the game and in two weeks time, it's the WOYWW two year anniversary where most of us are celebrating with a pay it forward gift! Come on folk - hands up - who has finished theirs???
My desk - actually looking relatively sane as I had cleaned up in between jobs for once. The wooden stamp is from a tag I just did for Grungy Monday and now I'm onto flower power snipping away at some Wendy Vecchi blooms. More on all that later in the week. I had a busy weekend with DT work which left me out of steam yesterday. I fiddled around all afternoon and evening and then binned all of it except one card which just made the cut. Had the ideas - but not the substance, so I just walked away...which was is a good and gutsy call for me.

Anyway onto my giveaway...
 I got this book a while back, not expecting too much yet it turned out to be quite alright. Full of many different projects, designs, styles, ideas and templates...a nice browse with lots you can adapt to your own tastes. It's in tip-top condition, as new, so you could also give it as a gift...no inside cover message from Auntie Flo. As I already have my own sea of books and magazines I thought somebody else might like it - so it's up for grabs wherever you live...
You don't need to limbo-dance through fire to get it, just leave a comment telling me why you'd like it and I'll pick a name for the next WOYWW. If you like to follow my blog, that'll be dandy but there's no obligation...linger, peruse and browse at leisure.

I'm off for my morning swim - best way to clean the ink off. Thanks for dropping by and I'll see you soon!

Sarah.